Getting a new concrete driveway is a big upgrade for your home, especially in busy Inland Empire neighborhoods like Rancho Cucamonga, Ontario, Upland, Fontana, Claremont, Chino, Chino Hills, Montclair, Eastvale, Corona, Riverside, San Bernardino, and Redlands. The smoother the preparation, the better your driveway will look and the longer it will last. This step-by-step guide walks you through what to expect before our A&R Concrete & Hardscape crew shows up, and what happens on site from removals to curing.
Step 1: Initial Planning, Layout, and Permits
Before anything is removed or poured, we confirm the driveway layout, width, slope, and drainage. This is when we double-check access to the garage, parking needs, and any HOA guidelines or city requirements. Many cities in the region may require permits or inspections for new or expanded driveways, so it’s smart to verify local rules through your municipality or county resources such as San Bernardino County Public Works or your city’s engineering department.
Step 2: Underground Utilities & Safety Checks
Before removals or excavation, underground utilities must be located and marked. Hitting a gas, water, or electrical line is both dangerous and costly. Homeowners can reference utility safety resources like Call 811 – Know What’s Below or local utility guidance from agencies such as the California Energy Commission. Once utilities are cleared and marked, we can proceed safely.
Step 3: Removals – Existing Concrete, Asphalt, or Landscaping
Next, we remove any existing driveway surface—concrete, asphalt, pavers, or temporary gravel—as well as any planter beds, small roots, or obstacles inside the new footprint. In older neighborhoods of Rancho Cucamonga, Ontario, or Riverside, this may involve hauling off cracked slabs or heavily settled areas. All debris is loaded out, and the work area is cleaned so we have a clear, defined space to rebuild from the ground up.
Step 4: Excavation, Grading & Drainage Planning
Once removals are complete, we excavate to the correct depth to allow for the new base material and concrete thickness. This is where proper grading is critical. The driveway should gently slope away from the house and garage, directing water toward the street, drains, or approved drainage paths. Good grading helps prevent puddles by the garage, water intrusion into the home, and long-term slab damage. For additional best practices on drainage and stormwater, homeowners can review resources from the U.S. Environmental Protection Agency (EPA) or the California Department of Water Resources.
Step 5: Base Installation & Compaction
After grading, we install a compacted base of suitable aggregate (often road base or class II base). This step is one of the most important for long-term performance. The base is placed in layers and mechanically compacted to minimize future settling under vehicle loads. In areas with clay or expansive soils, like pockets of Fontana or San Bernardino, proper base and compaction help reduce cracking, heaving, and uneven surfaces over time.
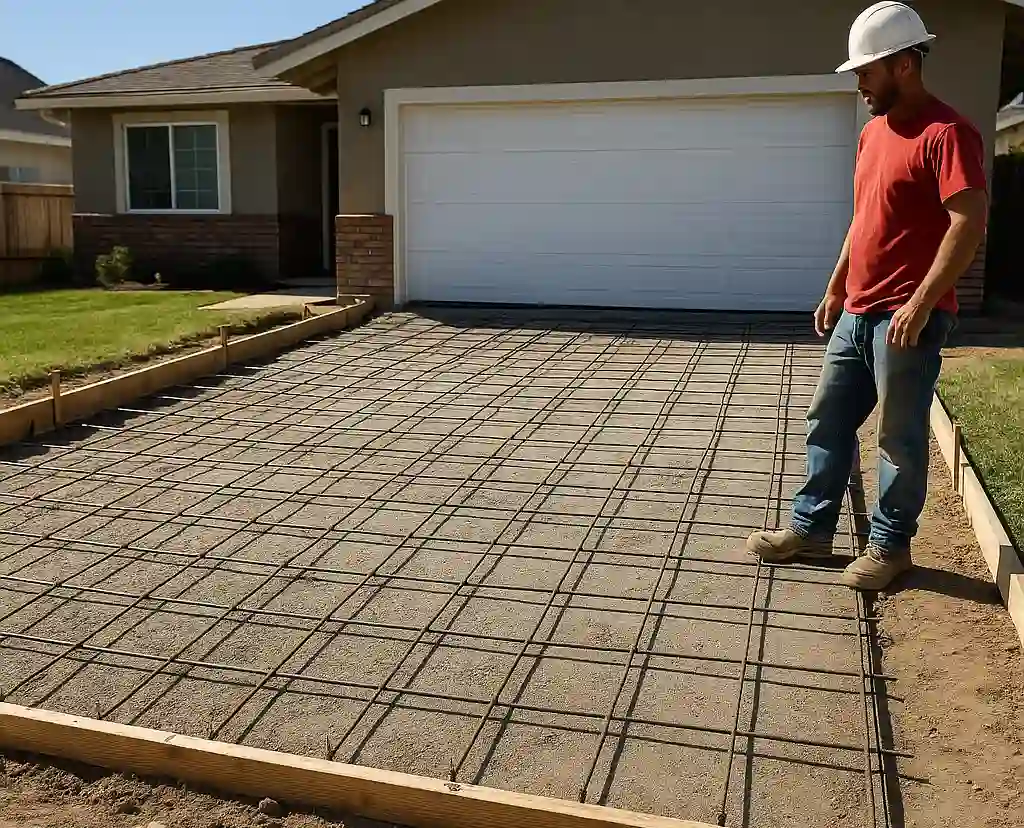
Step 6: Forms, Joints & Rebar Reinforcement
With the base in place, we set wood or metal forms around the driveway edges to define the final shape, elevations, and clean lines at the street, walkways, or side yards. Then we install reinforcing steel—typically rebar or welded wire mesh—on chairs so it sits within the slab rather than directly on the base. Reinforcement helps control cracking and improves overall strength. For those who like to dive deeper into technical standards, organizations like the American Concrete Institute (ACI) and local engineering programs such as Cal Poly Pomona offer excellent educational resources.
Step 7: Concrete Pour & Finishing
On pour day, our crew coordinates timing with the ready-mix supplier so the concrete arrives at the correct slump and mix design for driveway use. The concrete is placed, leveled, and screeded, then floated to bring up a smooth surface. Depending on your design, we may apply a broom finish for better traction, add decorative borders, or create a stamped or colored finish for extra curb appeal. Control joints are cut or formed to help manage where natural shrinkage cracks appear.
Step 8: Curing – Protecting Your Investment
Once the finishing is complete, curing begins. Curing is the controlled process of allowing concrete to gain strength and moisture over time. We typically apply a curing compound or sealer and instruct homeowners to keep vehicles off the new driveway for a specified period (often about a week, depending on weather and mix). In the hot Inland Empire climate, proper curing helps prevent surface cracking, scaling, and premature wear. For general concrete durability guidance, you can also review information from the Portland Cement Association.
Step 9: Final Walkthrough & Long-Term Care
After the concrete has cured enough for normal use, we complete a final walkthrough with you, review expansion joints, edges, and transitions, and discuss basic maintenance: keeping chemicals and heavy oils off the surface, avoiding sharp metal edges, and scheduling resealing for decorative finishes every few years. Whether your home is in Rancho Cucamonga, Ontario, Upland, Fontana, Corona, or Riverside, the same basic care steps will help your driveway look clean and perform well for decades.
How A&R Concrete & Hardscape Makes the Process Easier
A&R is Rancho Cucamonga’s top-rated concrete contractors, and we handle the heavy lifting—from removals and grading to compaction, rebar, pour, and curing—so you don’t have to worry about the technical details. We serve homeowners throughout Rancho Cucamonga, Ontario, Upland, Fontana, Claremont, Pomona, Chino, Chino Hills, Montclair, Eastvale, Corona, Riverside, San Bernardino, and Redlands. If you’re considering a new concrete driveway, we’re happy to visit your property, review access and drainage, and provide a clear, step-by-step plan and estimate tailored to your home.